Asana Integration
Connect your Asana workspace to Socket to create and manage Asana tasks from alerts, with manual creation and automated ticketing rules.
The Asana integration is currently in Beta and is available on Business and Enterprise plans.
Connect your Asana workspace to Socket to create and manage Asana tasks directly from Socket alerts. Create tasks manually from individual alerts, or set up automated ticketing rules that create and update Asana tasks based on alert events in your organization.
The integration connects to Asana using OAuth. Authorization happens entirely from the Socket dashboard — there is no separate app to install in a third-party admin console.
Key capabilities
- Manual task creation — Create an Asana task from alerts in the Socket dashboard.
- Automated ticketing rules — Define rules that automatically create Asana tasks when specific alert events occur, with configurable conditions, project, tags, and assignee.
- Two-way sync — When linked Asana tasks are updated, completed, or deleted, Socket is notified and can update the alert accordingly.
- Multi-workspace support — Connect more than one Asana workspace to a single Socket organization.
Prerequisites
- Confirm your Socket account is on a Business or Enterprise plan.
- Have an Asana workspace ready, with permission to authorize apps and access to the projects you want Socket to use.
- Hold an Owner or Admin role in your Socket organization (required to connect and disconnect the integration).
Connect Asana to Socket
Step 1: Open the Asana integration page
In the Socket dashboard, go to Settings → Integrations → Asana for your organization, then click Connect.
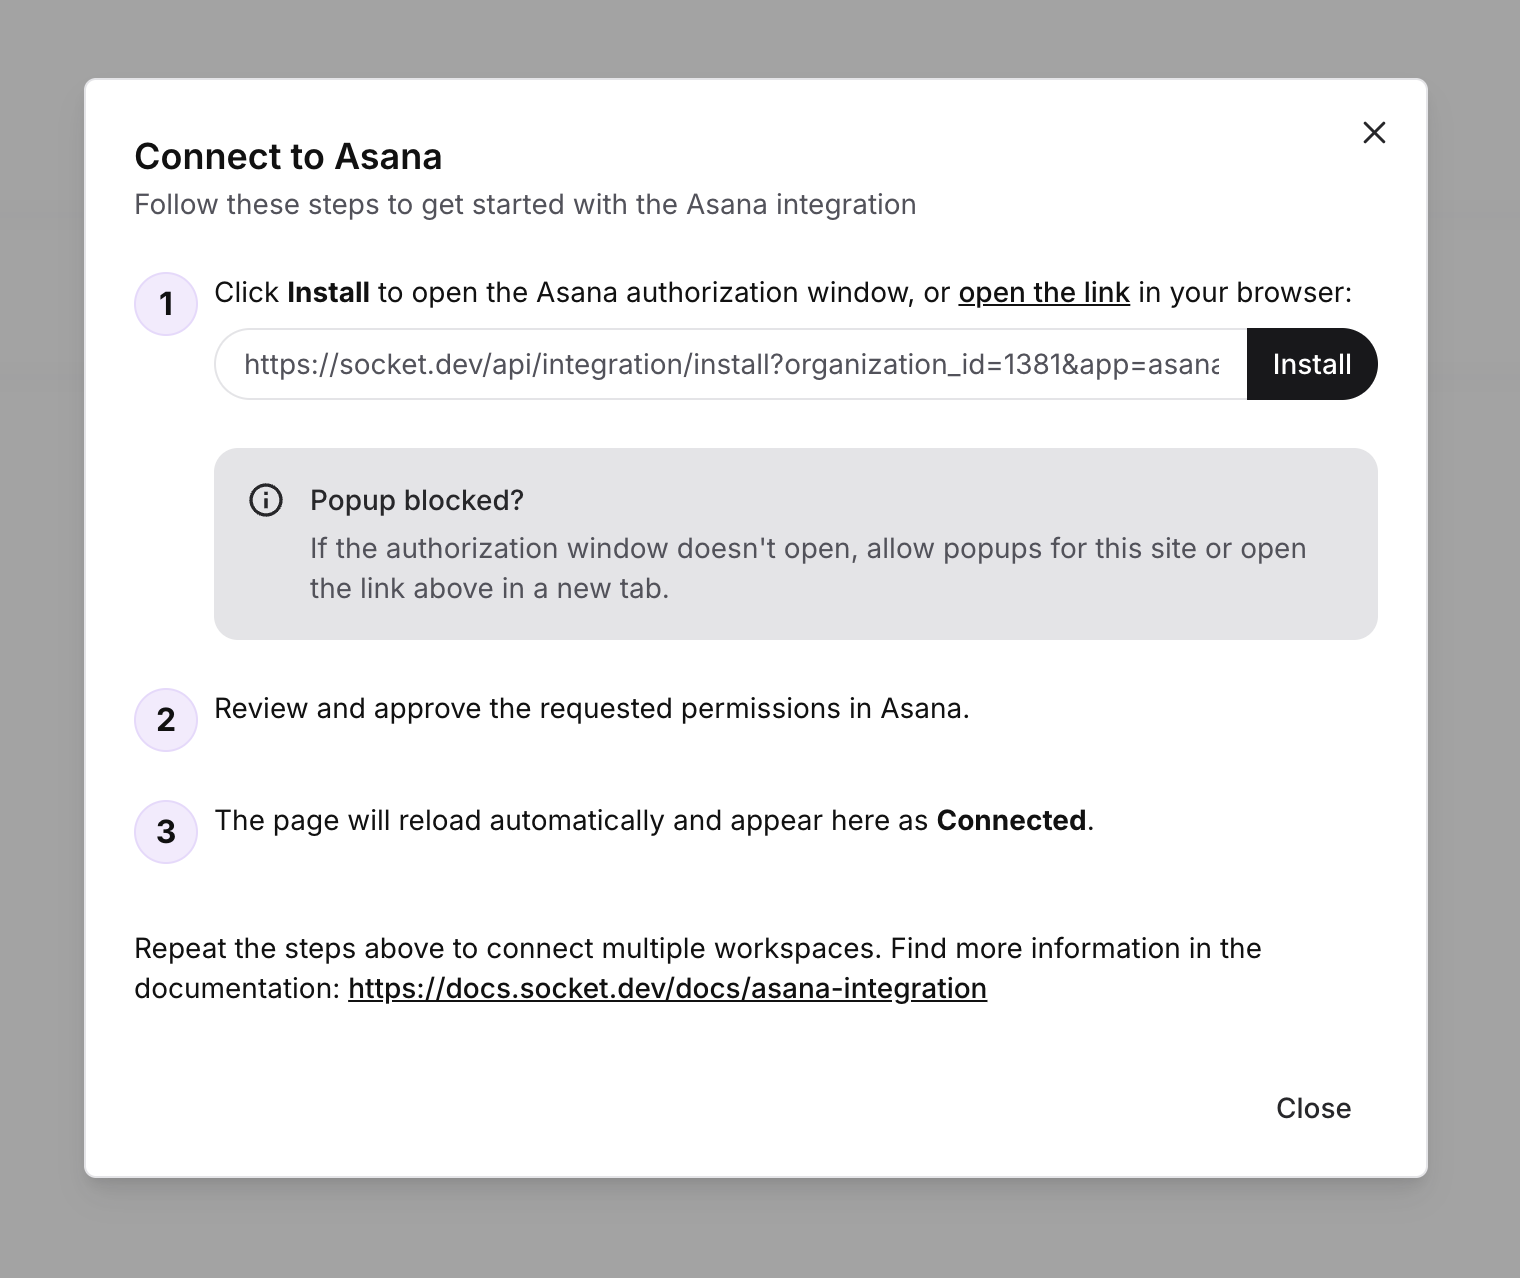
A dialog opens with step-by-step instructions and an installation link.
Step 2: Start the authorization
- Click Install to open the Asana authorization window.
- If the authorization window does not open, your browser may be blocking popups. Allow popups for this site, or copy the installation link shown in the dialog and open it in a new browser tab.
Step 3: Approve the requested permissions in Asana
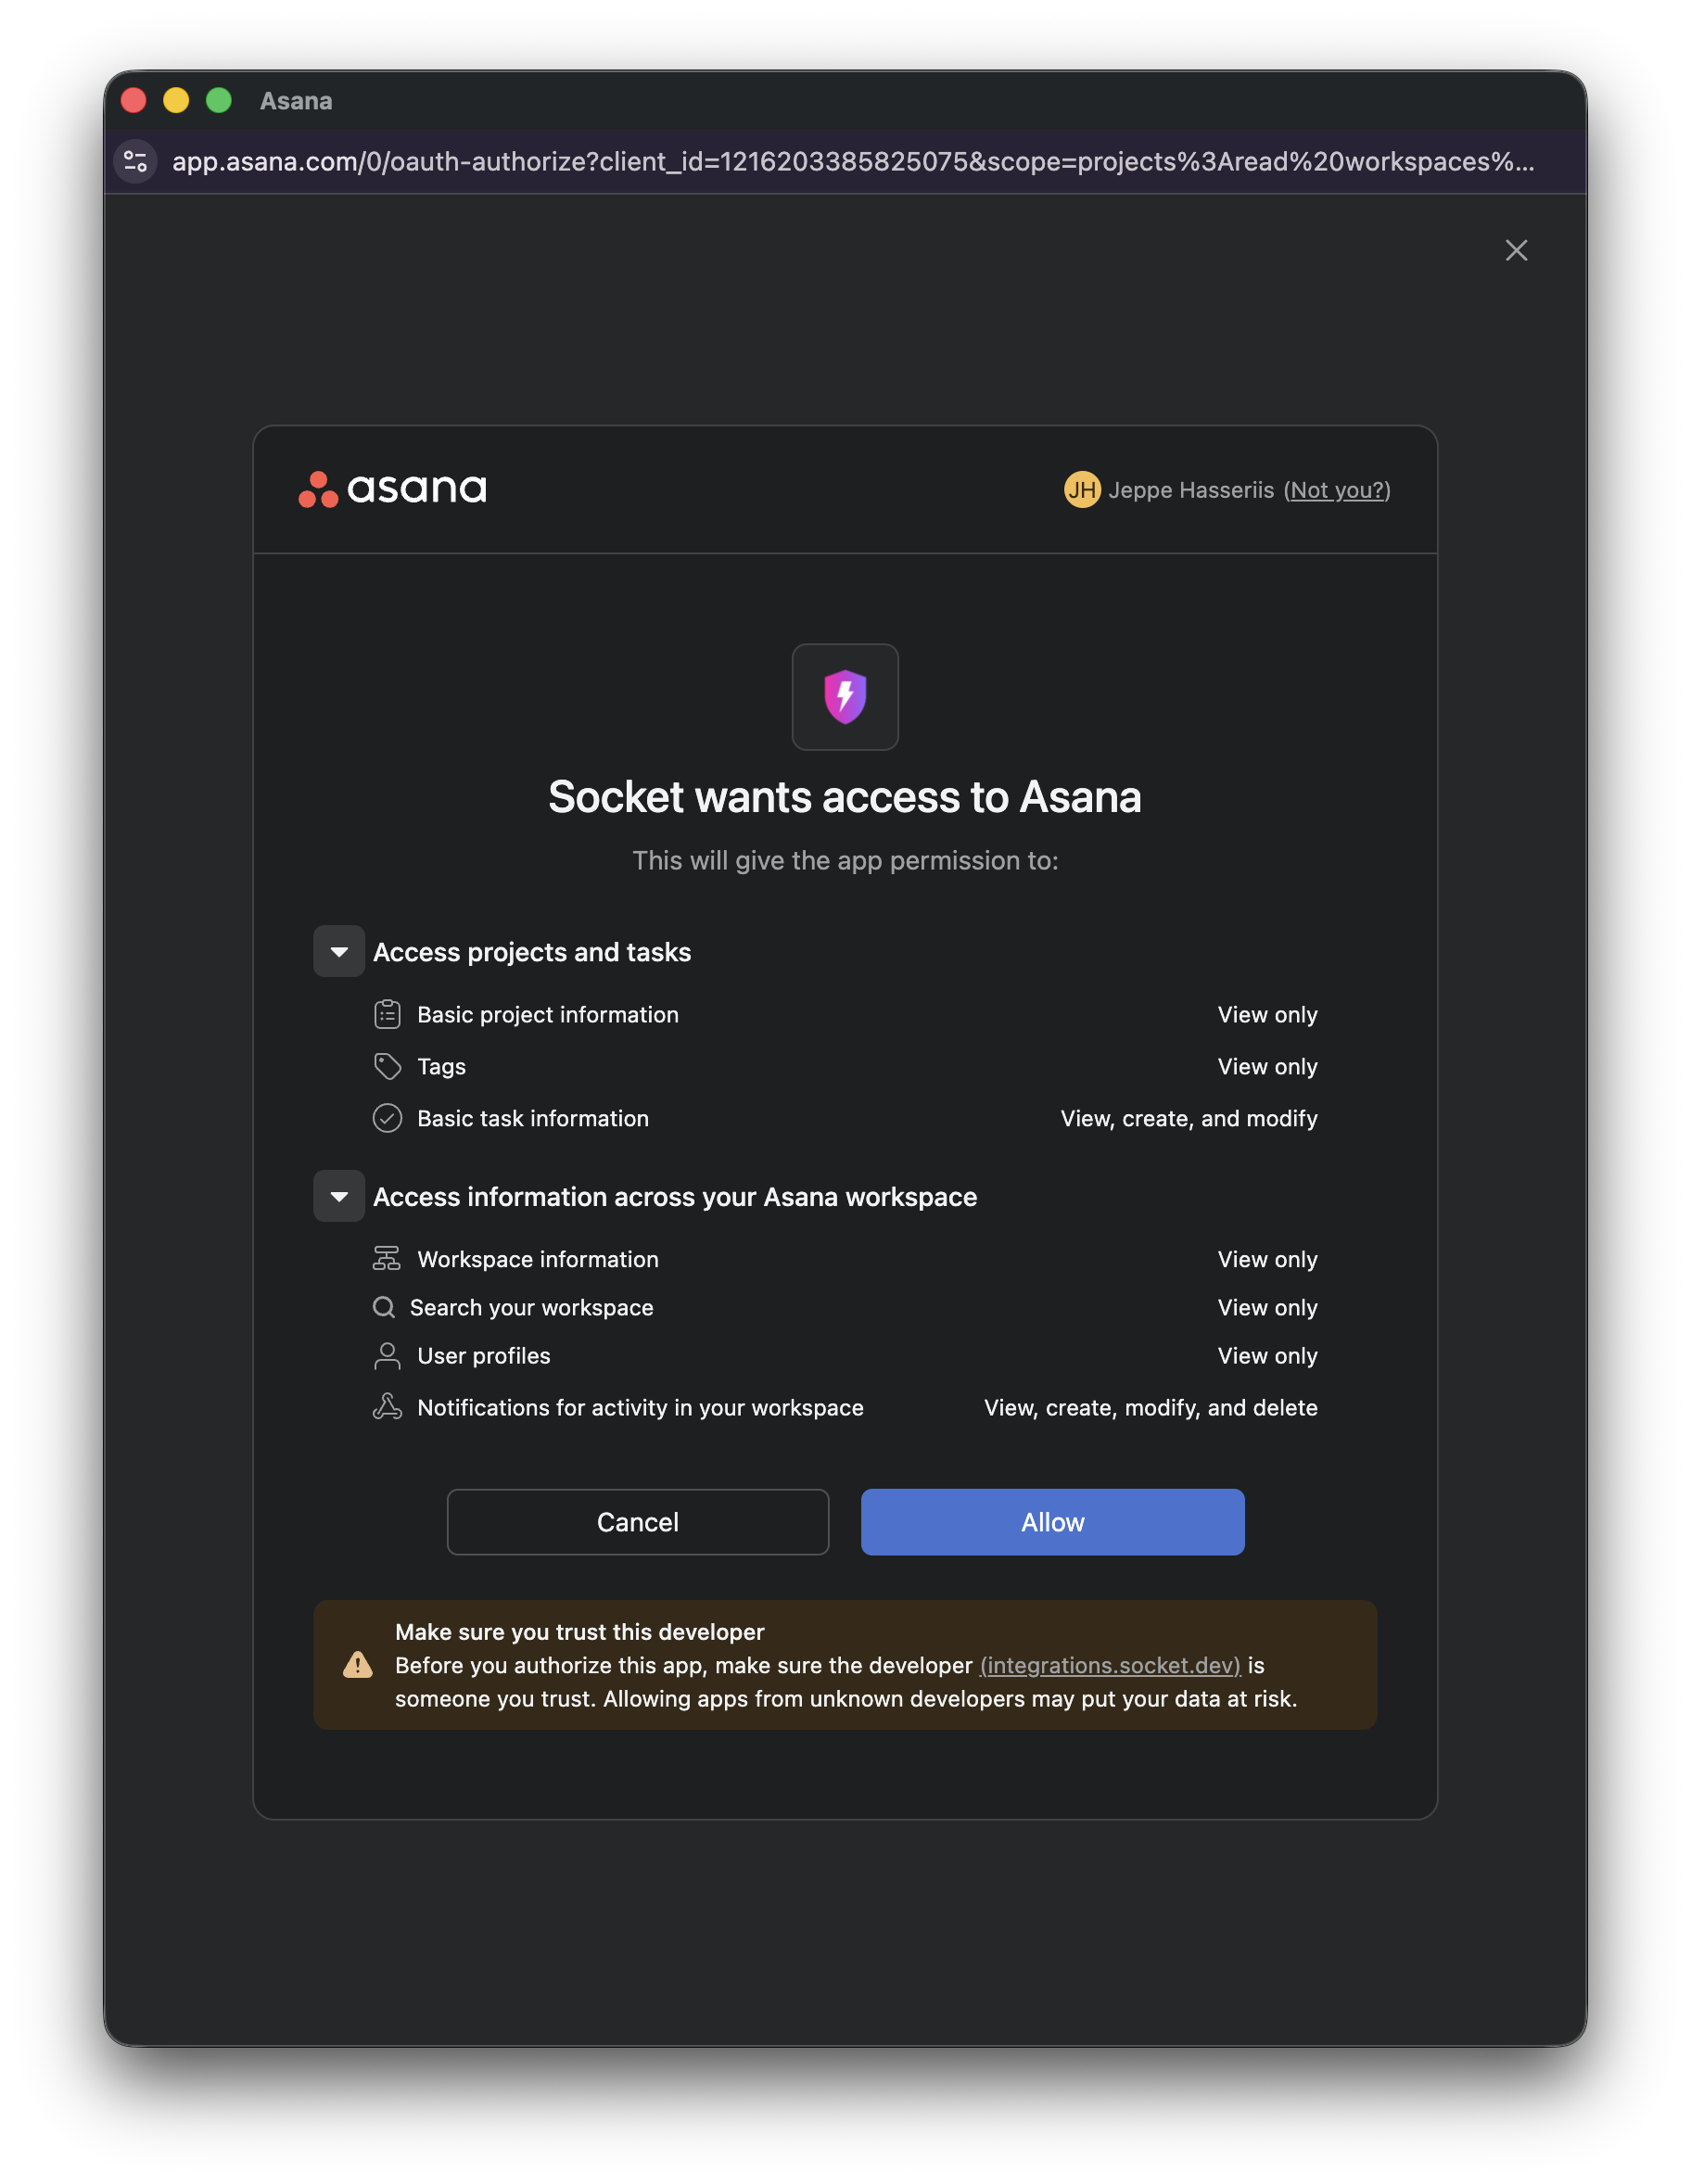
In the Asana authorization window:
- Review the requested permissions.
- Approve the connection for the Asana account and workspace you want Socket to use.
Socket requests the following Asana OAuth scopes:
- projects:read — List projects where tasks can be created.
- workspaces:read — Read workspace information.
- workspaces.typeahead:read — Search workspace members when assigning tasks.
- tags:read — Read tags used as labels on created tasks.
- users:read — Validate assignees.
- tasks:read / tasks:write — Read, create, update, and complete tasks.
- webhooks:read / webhooks:write / webhooks:delete — Register project webhooks so task updates sync back to Socket.
Tip: If you belong to multiple Asana workspaces and want to use more than one with Socket, create a separate connection for each workspace (repeat Connect while signed into the intended Asana account/workspace context).
Step 4: Verify the connection
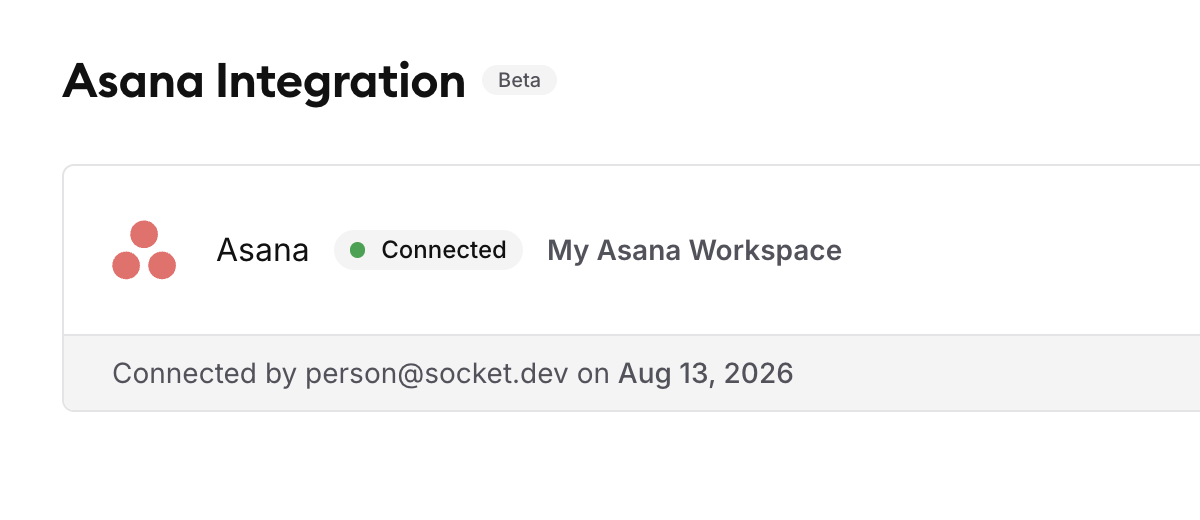
After you authorize, the Socket dashboard reloads automatically and the connection appears under Settings → Integrations → Asana with a Connected status badge, including the workspace name, who connected it, and when.
Tip: To connect additional Asana workspaces, repeat the steps above.
Disconnect Asana
To disconnect an Asana workspace from your Socket organization:
- Go to Settings → Integrations → Asana in the Socket dashboard.
- Find the Asana connection you want to remove.
- Click the button with the 3 dots, and select Disconnect..., then confirm.
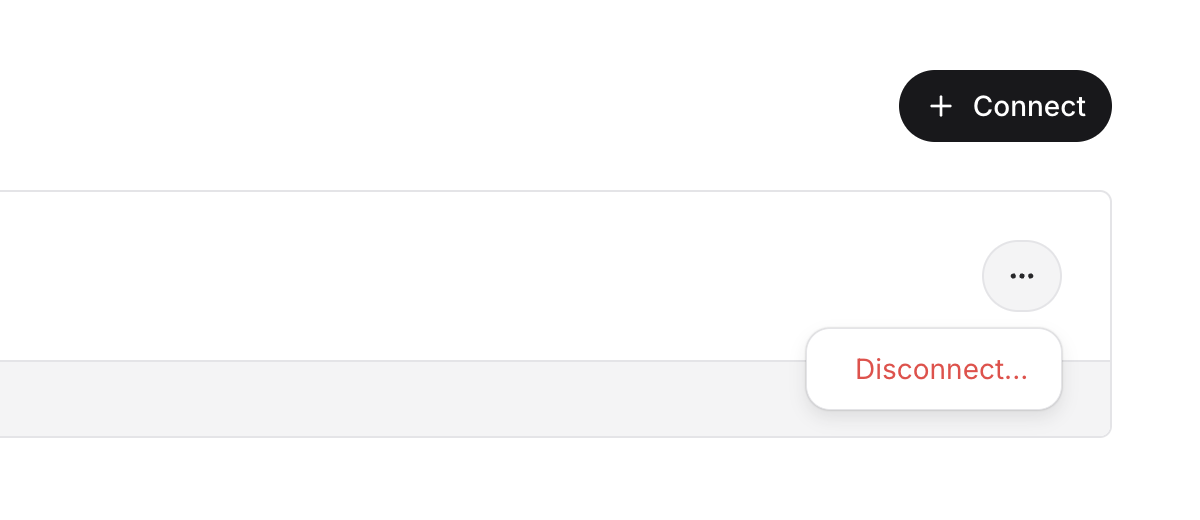
This removes the link between the Asana workspace and your Socket organization. Existing tasks in Asana are not deleted or modified.
Alternatively, an Asana admin can revoke the connection in the Asana account or workspace settings.
If a connection shows an Error or revoked status, remove the connection and create a new one to restore access.
Create Asana tasks from alerts
Once the integration is connected, you can create Asana tasks directly from alerts in the Socket dashboard.
- Open an alert in the Socket dashboard.
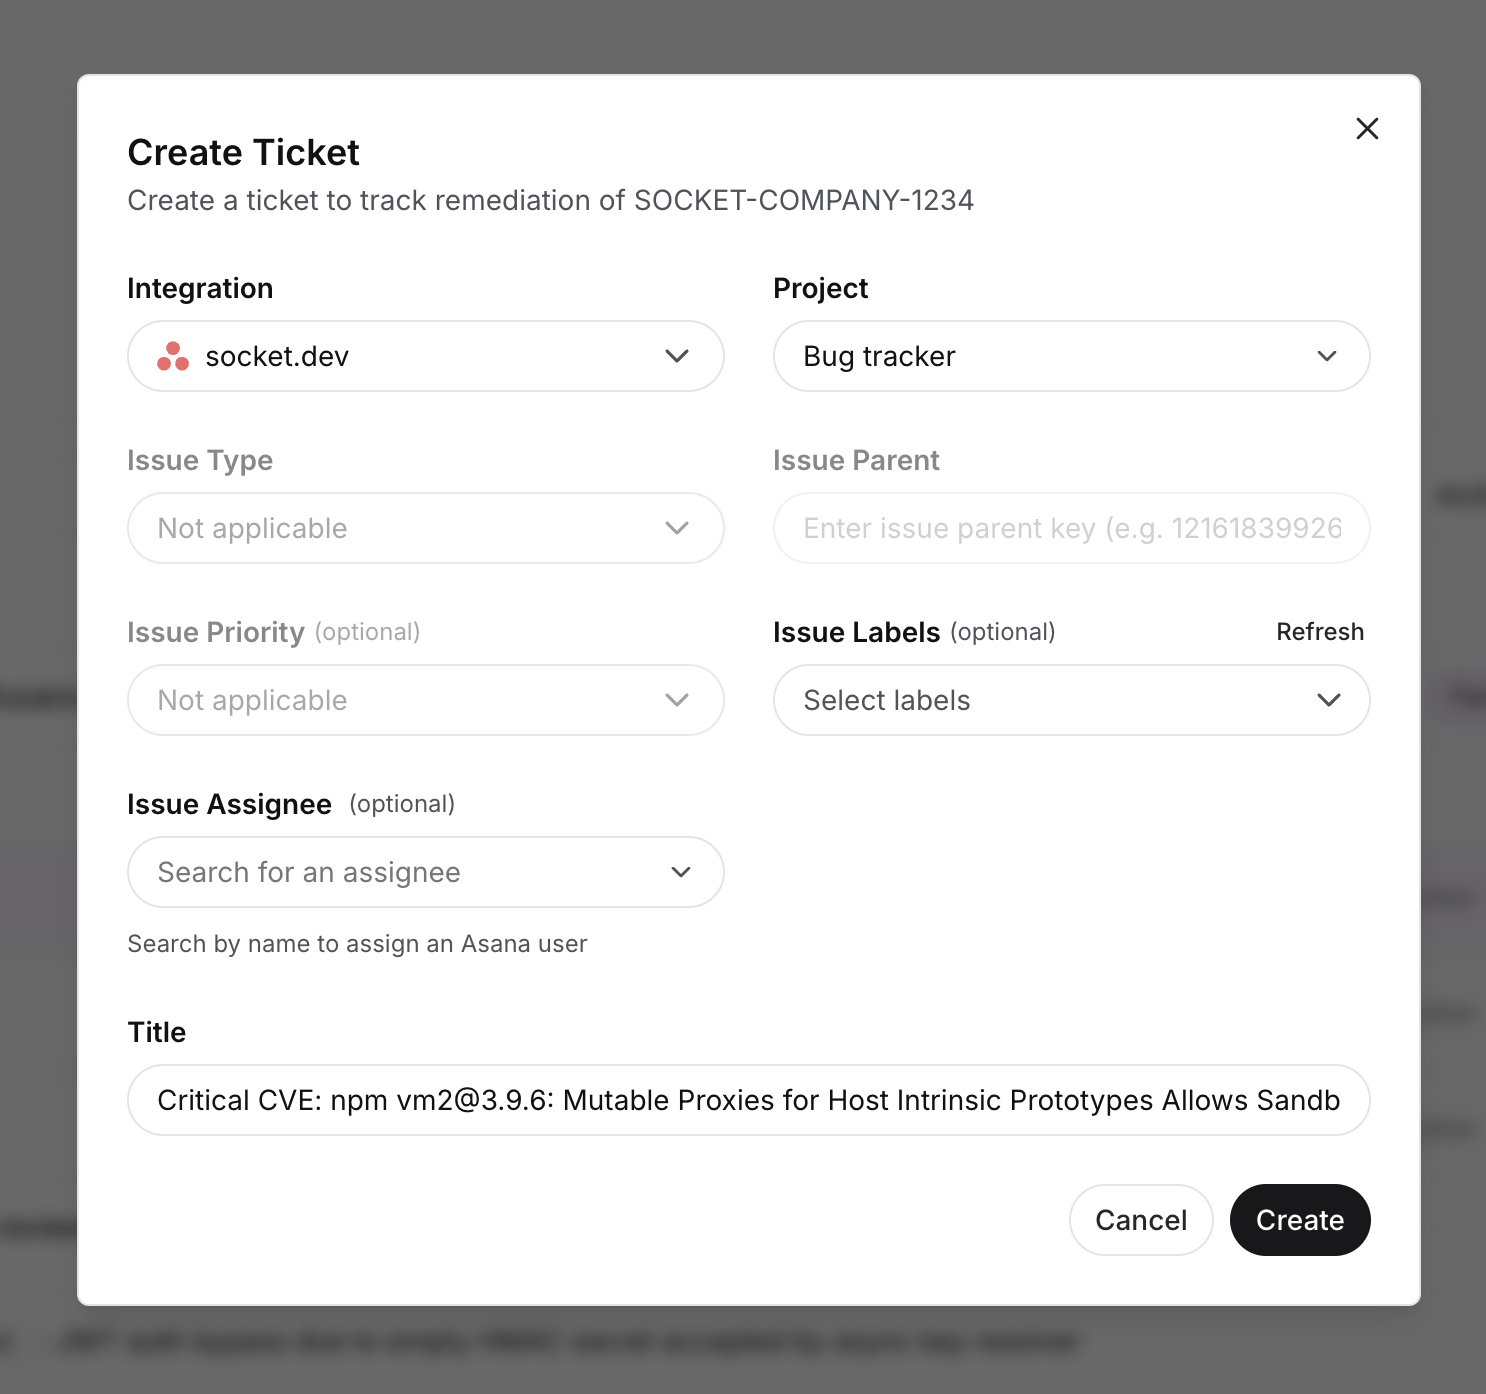
- Click the Create Ticket button.
- Select the Asana connection and Project, then fill in any additional fields (tags, assignee).
- Submit to create the task.
The created task is linked to the alert, and a link to the Asana task appears on the alert so you can navigate directly to it.
Automated ticketing rules
Automated ticketing rules let you define conditions under which Asana tasks are automatically created and updated. Configure these rules from Settings → Integrations → Ticketing in the Socket dashboard.
Ticketing is available on Business and Enterprise plans.
Create a ticketing rule
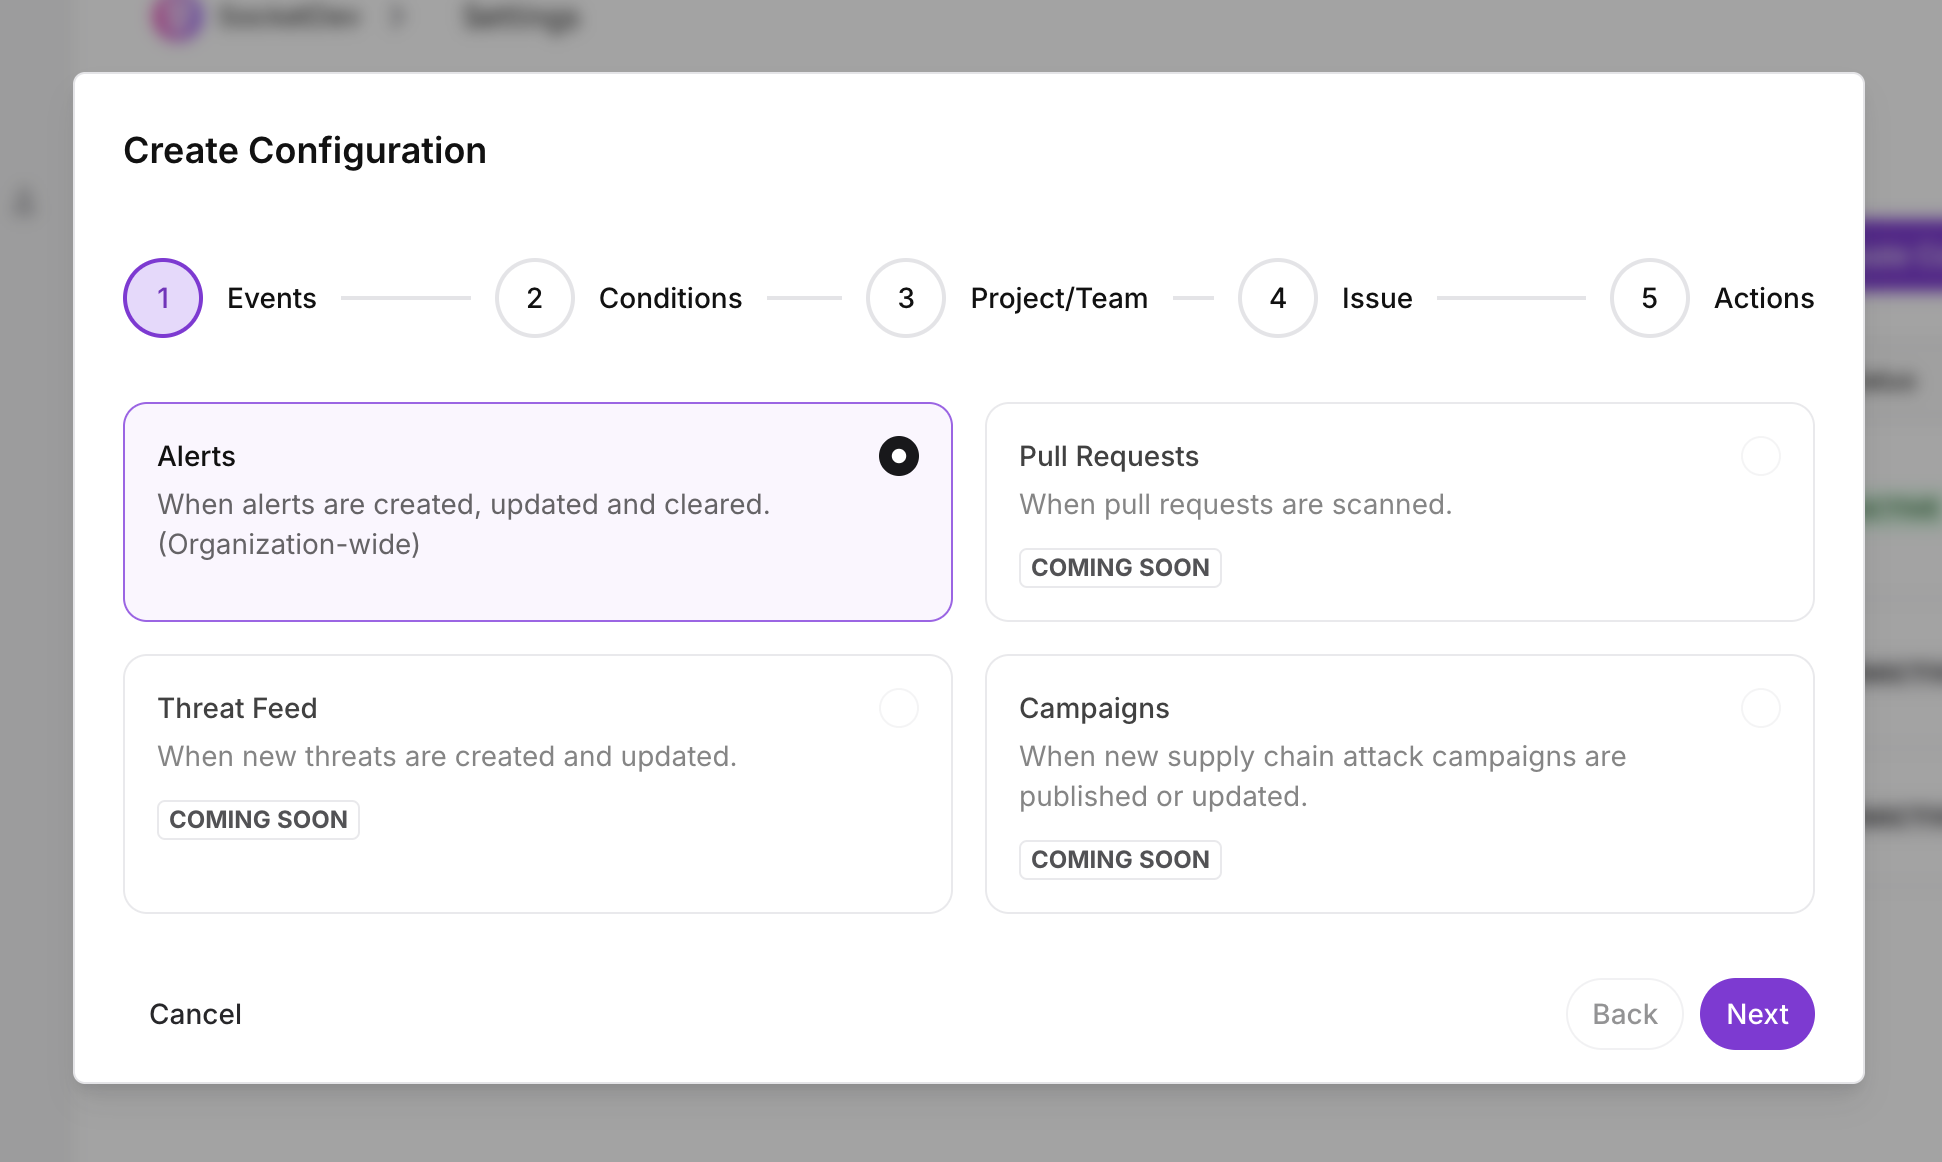
Click Create Configuration to start the wizard:
1. Select events
Choose which events should trigger the rule.
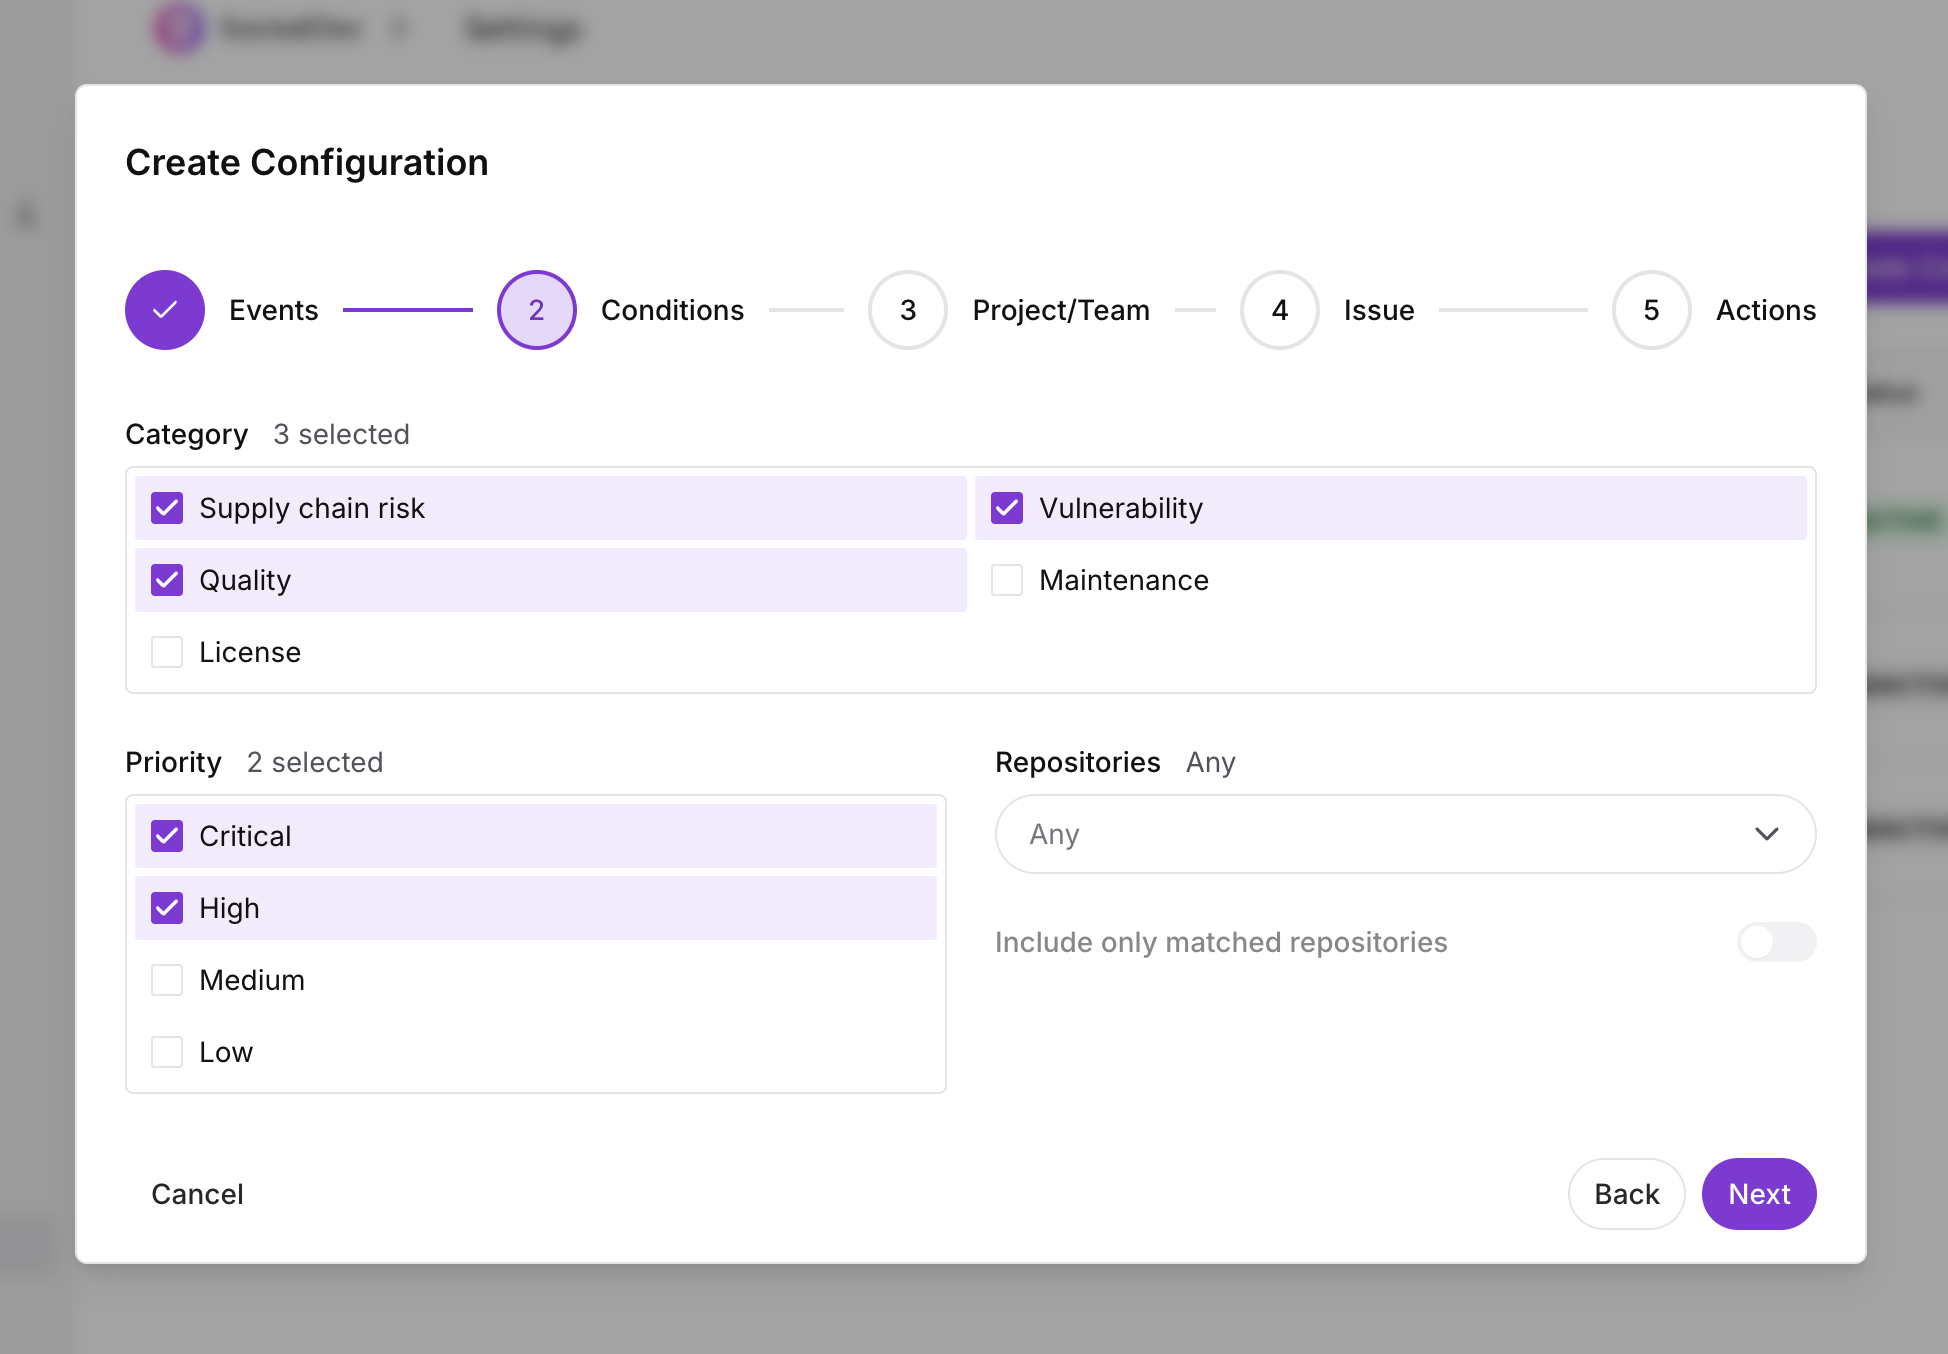
2. Select conditions
Optionally define conditions to filter which alerts match this rule, targeting specific alert types, priority levels, repositories, or other attributes.
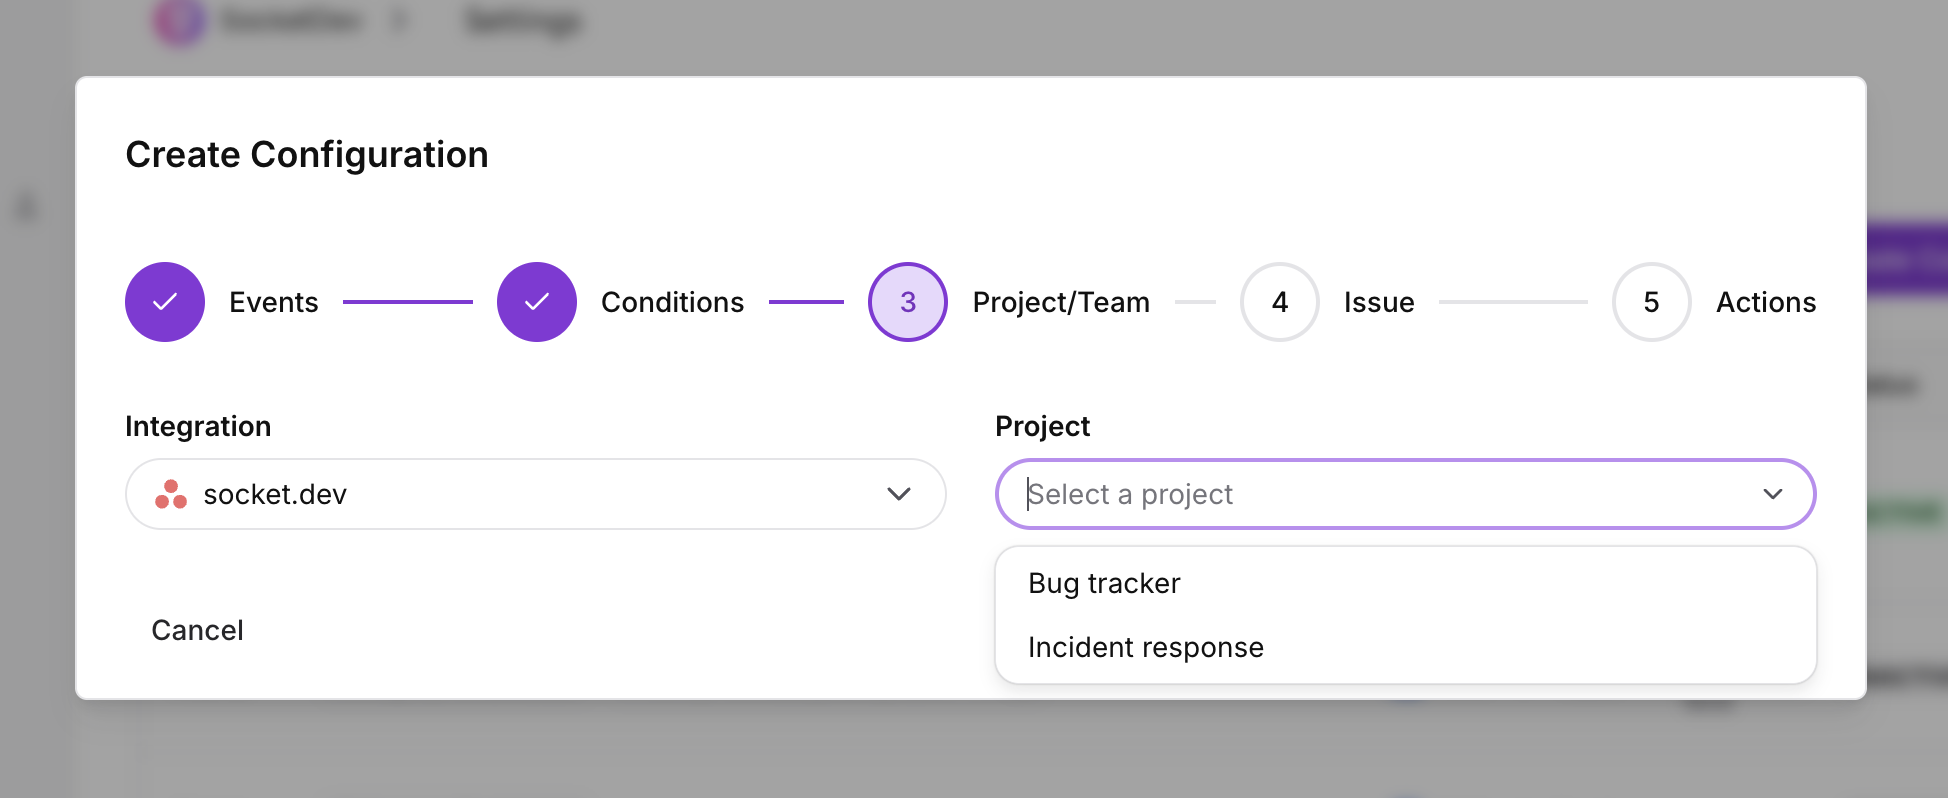
3. Select project
Choose the Asana connection and where tasks should be created:
- Integration — Select which connected Asana workspace to use.
- Project — Search and select the Asana project where tasks will be created.
4. Configure issue
Define how the Asana task should be created:
- Labels — Optionally add Asana tags to created tasks.
- Assignee — Optionally assign the task to an Asana user (search by name).
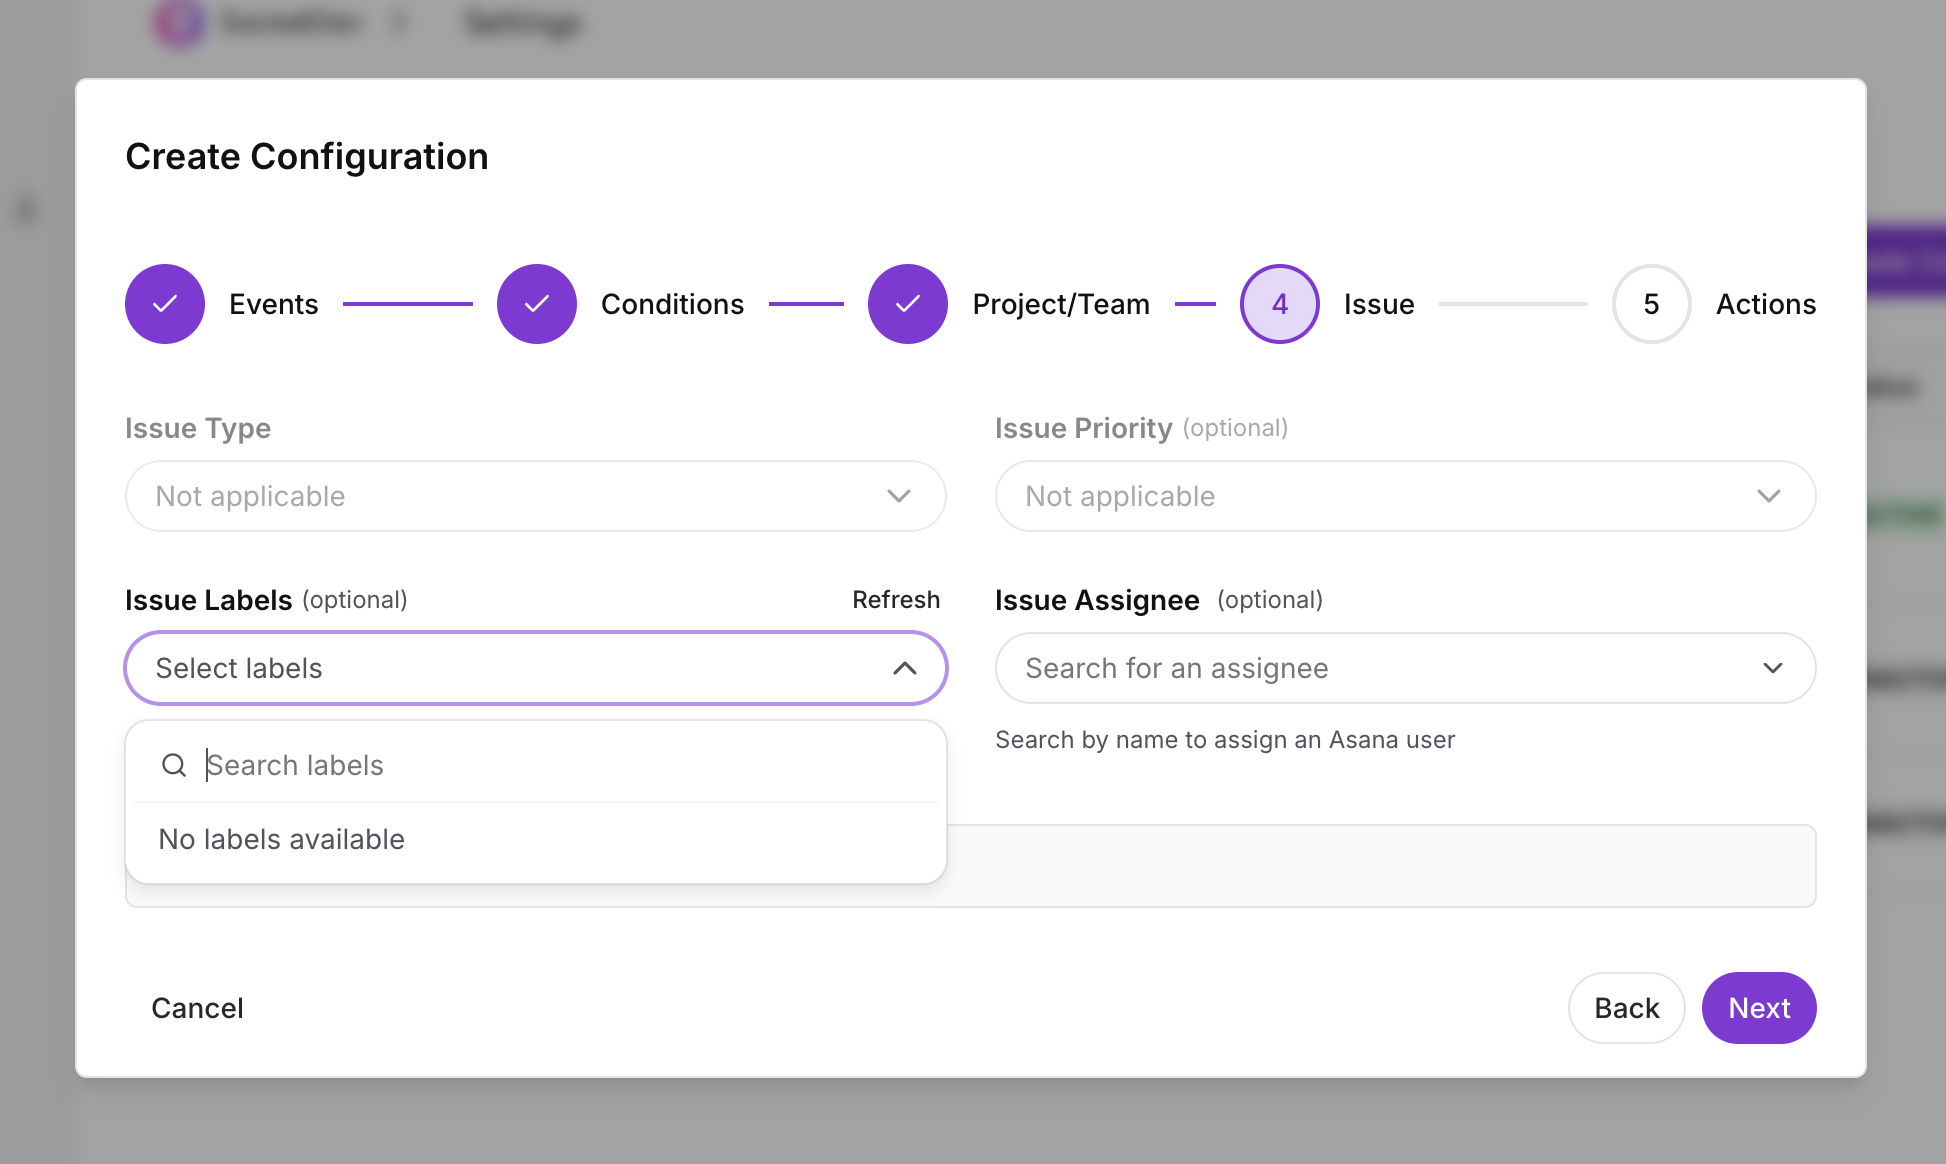
Note: Asana does not use issue types, and Socket does not map alert priority to an Asana priority field. Additional fields under Advanced settings are not supported for Asana.
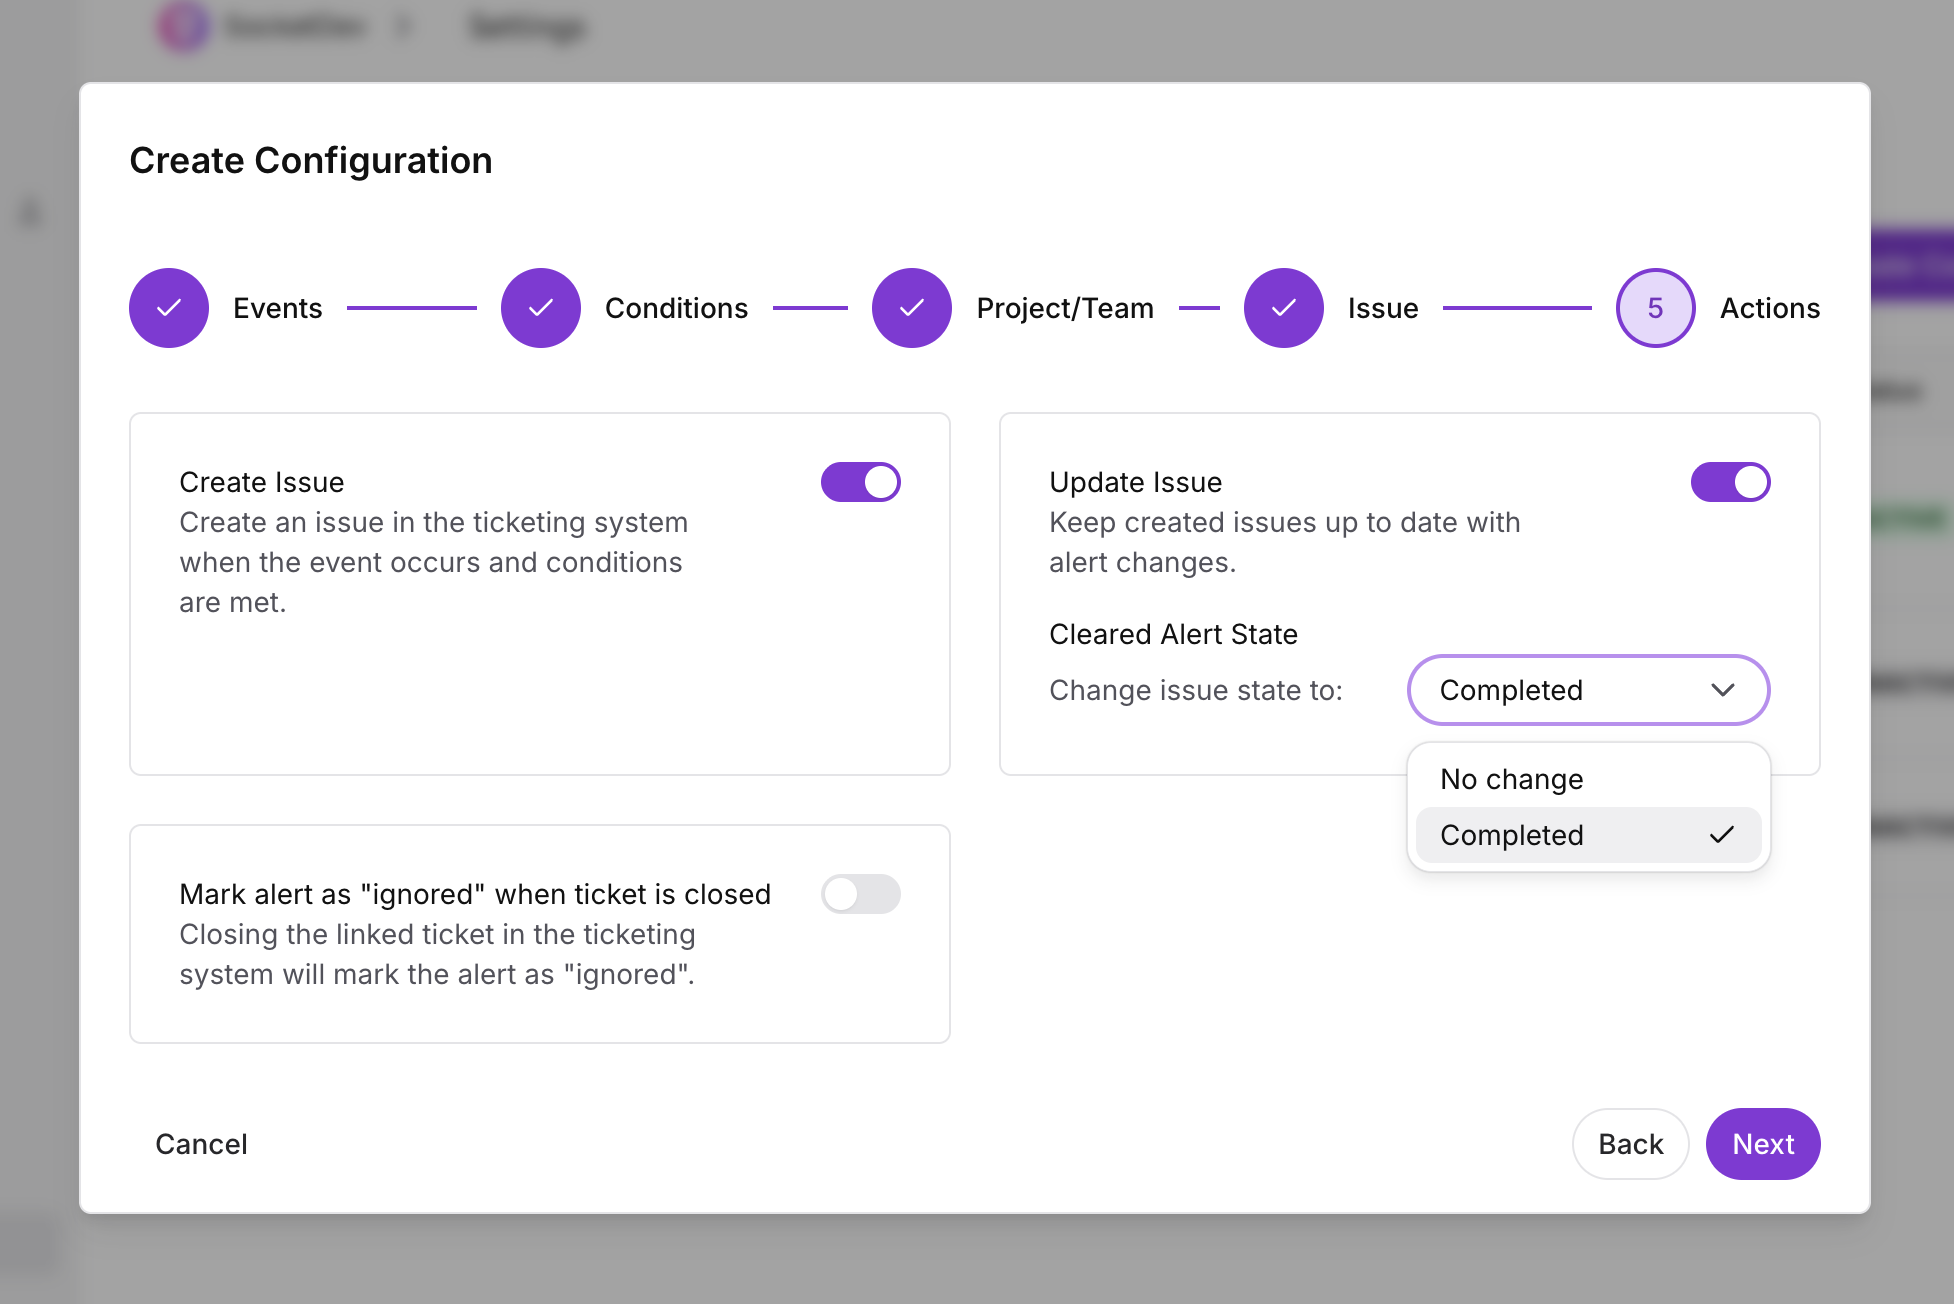
5. Configure actions
Define what happens when alert state changes:
- Create issue — Automatically create a new Asana task when the rule conditions are met.
- Update issue — Update the linked Asana task when the alert is updated. Optionally mark the Asana task as Completed when the alert is cleared in Socket.
- Mark alert as "ignored" when ticket is closed — Optionally triage-ignore the Socket alert when the linked Asana task is completed or closed.
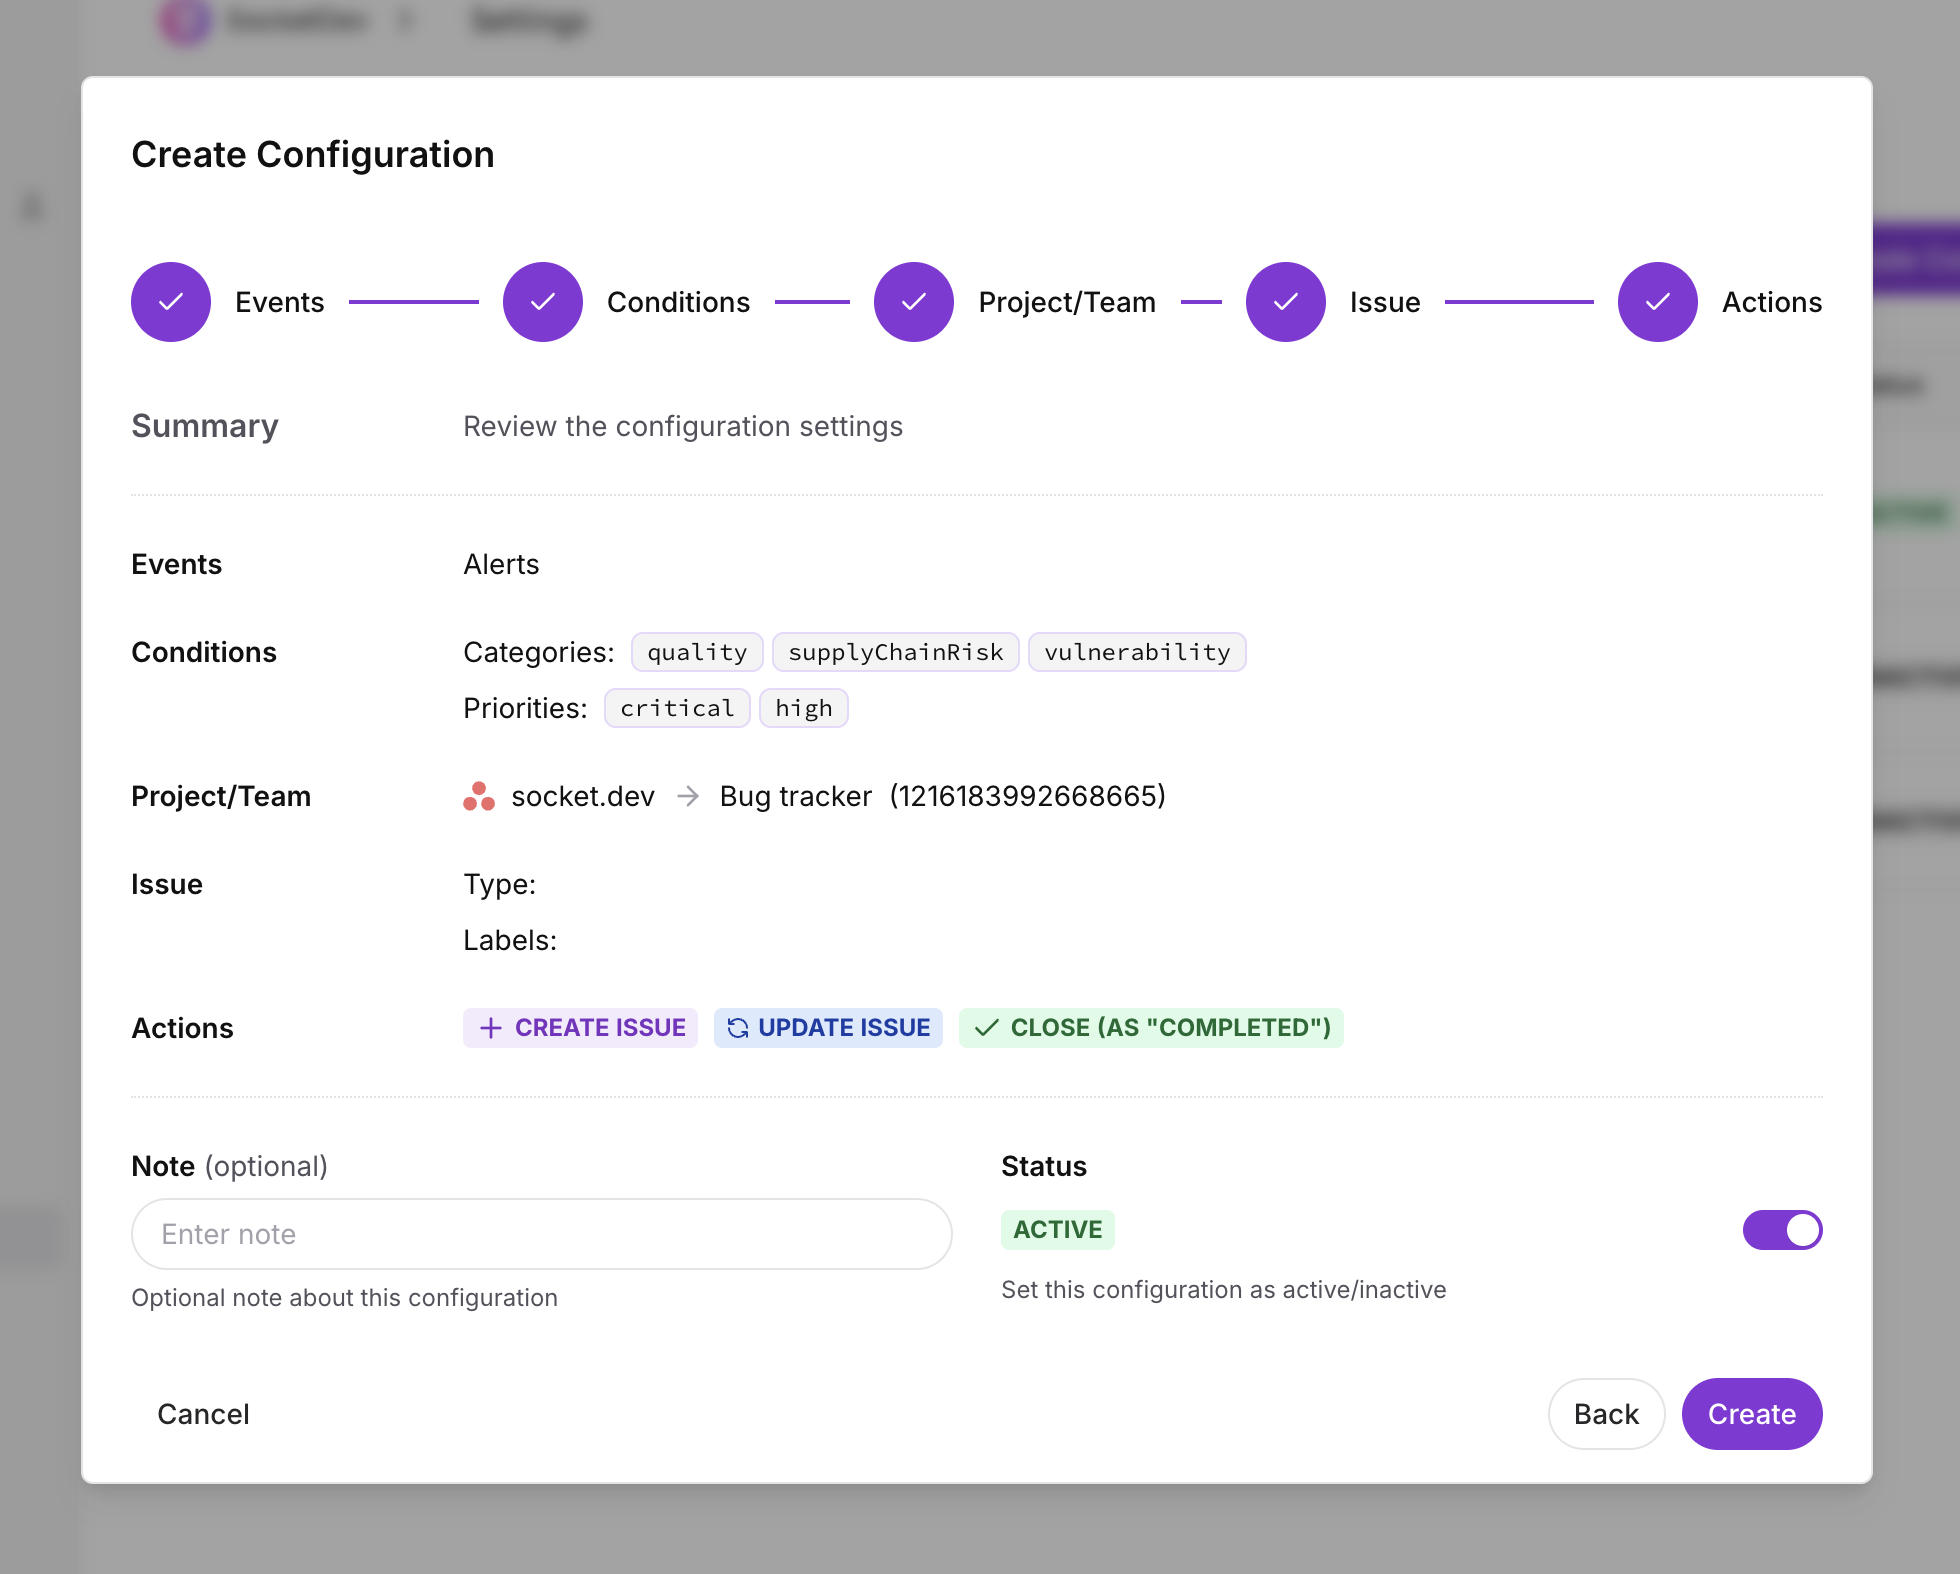
After reviewing the summary, click Create to activate the rule.
Permissions
Socket roles
| Role | Capabilities |
|---|---|
| Owner | Connect, disconnect, configure ticketing rules |
| Admin | Connect, disconnect, configure ticketing rules |
| Member | View connections, create tasks from alerts |
| Contributor | View connections |
Asana app permissions
When you authorize the integration, Socket requests permission to read workspace and project data, search members, read tags, and create/update/complete tasks for the workspaces available to the authorizing user. Socket also registers project webhooks so task changes sync back to Socket. Socket does not access data outside the workspaces your Asana account can reach.
Troubleshooting
Popup blocked during Install
Your browser may be blocking popups. Allow popups for the Socket dashboard, or copy the installation link from the Connect dialog and open it in a new browser tab.
Connection shows Error or Revoked
The access granted to Socket may have been revoked in Asana, or the token may need to be refreshed after permission changes. Remove the connection in Settings → Integrations → Asana and connect again.
Ticketing rule is not creating tasks
Verify the following:
- The ticketing rule is set to Active status.
- The Asana workspace is still connected (check Settings → Integrations → Asana).
- The alert event matches the rule's event and condition filters.
- The selected Asana project is still valid in your workspace.
- The alert is not monitored or ignored. Socket does not create or update tickets for alerts in those states.
Cannot connect or disconnect
Only users with Owner or Admin roles in the Socket organization can connect or disconnect the integration. If you have a different role, ask an administrator to complete the connection.
I have another problem
If you encounter problems or have questions not explained here, contact support.
Known issues and limitations
Multiple Asana workspaces on one account
Socket currently uses the primary workspace associated with the connection when listing projects and registering webhooks. To use another Asana workspace, create a separate connection while authorizing with that workspace context.
No native priority or section selection
Asana priorities are custom fields in many workspaces, and project sections are not available with Socket’s granular OAuth scopes. Ticketing rules therefore do not offer priority or section/status pickers for Asana. When an alert is cleared, Socket can mark the linked task as Completed.
Advanced settings / additional fields
Additional fields under Advanced settings in the ticketing configuration have no effect on Asana tasks. These fields are not supported for Asana.
Next steps
- Webhooks — Set up webhooks to receive real-time notifications for alert events.
- Customizable Security Policies — Configure which alert types trigger warnings and blocks across your organization.
- Organization Alerts — Review and manage alerts across all repositories in your organization.
Updated about 1 month ago