Webhooks
Webhooks are available on Business and Enterprise plans.
Introduction
You can setup and configure a webhook in your organization dashboard settings, which will receive any new or updated pull request notifications generated by the Socket Organization's associated GitHub app installation.
If you are new to webhooks, here's short introduction:
Webhooks are a common name for HTTP callbacks, and are how services notify each other of events. Webhooks are part of a service's API, though you can think of them as a sort of a reverse API. When a client wants to make a request to a service they make an API call, and when the service wants to notify the client of an event the service triggers a webhook (“a user has paid”, “task has finished”, etc.).
Webhooks are server-to-server, in the sense that both the customer and the service in the above description, should be operating HTTP servers, one to receive the API calls and one to receive the webhooks.It's important to note that while webhooks usually co-exist with a traditional API, this is not a requirement, and some services send webhooks without offering a traditional API.
Create a webhook
Owners and admins can create and edit webhooks. Members and contributors can only view webhooks.
You'll find webhook creation in the settings.
- Go to Dashboard → Settings for your organization
- Select "Webhooks" in the menu (under “Integrations”) and click “Create webhook”.
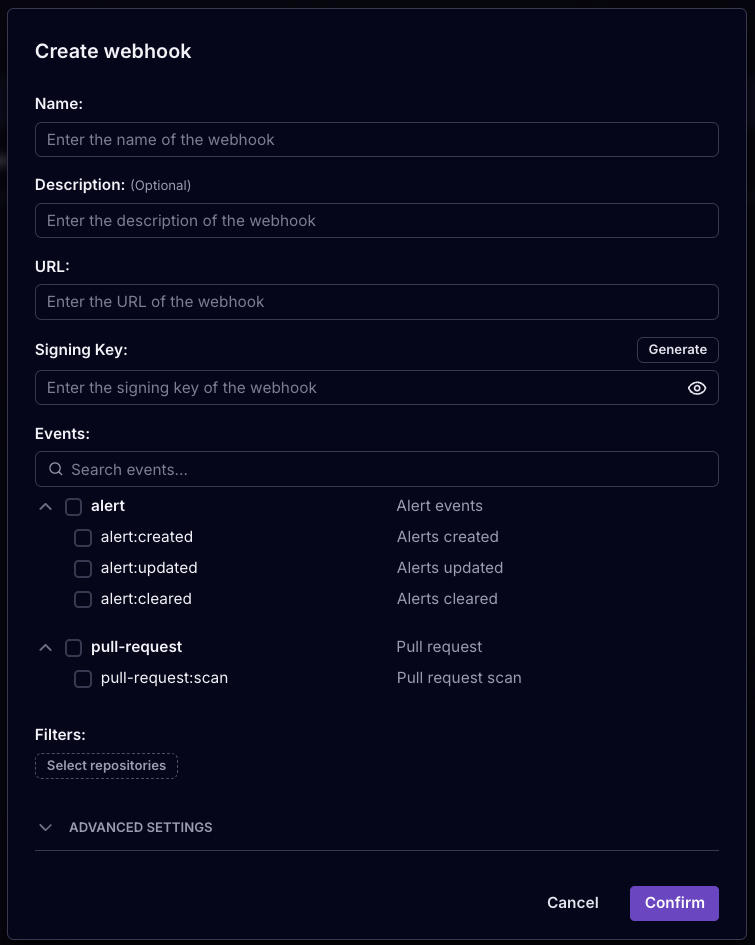
- Fill in the required information
- Note: the URL will receive a POST request
- The signing key is required and will allow you to verify the webhook payload. See "Verify the webhook payload" below. You can either fill in your own key, or generate one and copy it to your receiving system. See "Webhook signing key" below.
- Select at least 1 event type.
- Save the webhook by clicking "Confirm"
Filtering
Additionally you may want to specify from which repositories you want to receive webhooks. You can do so with the filter option.
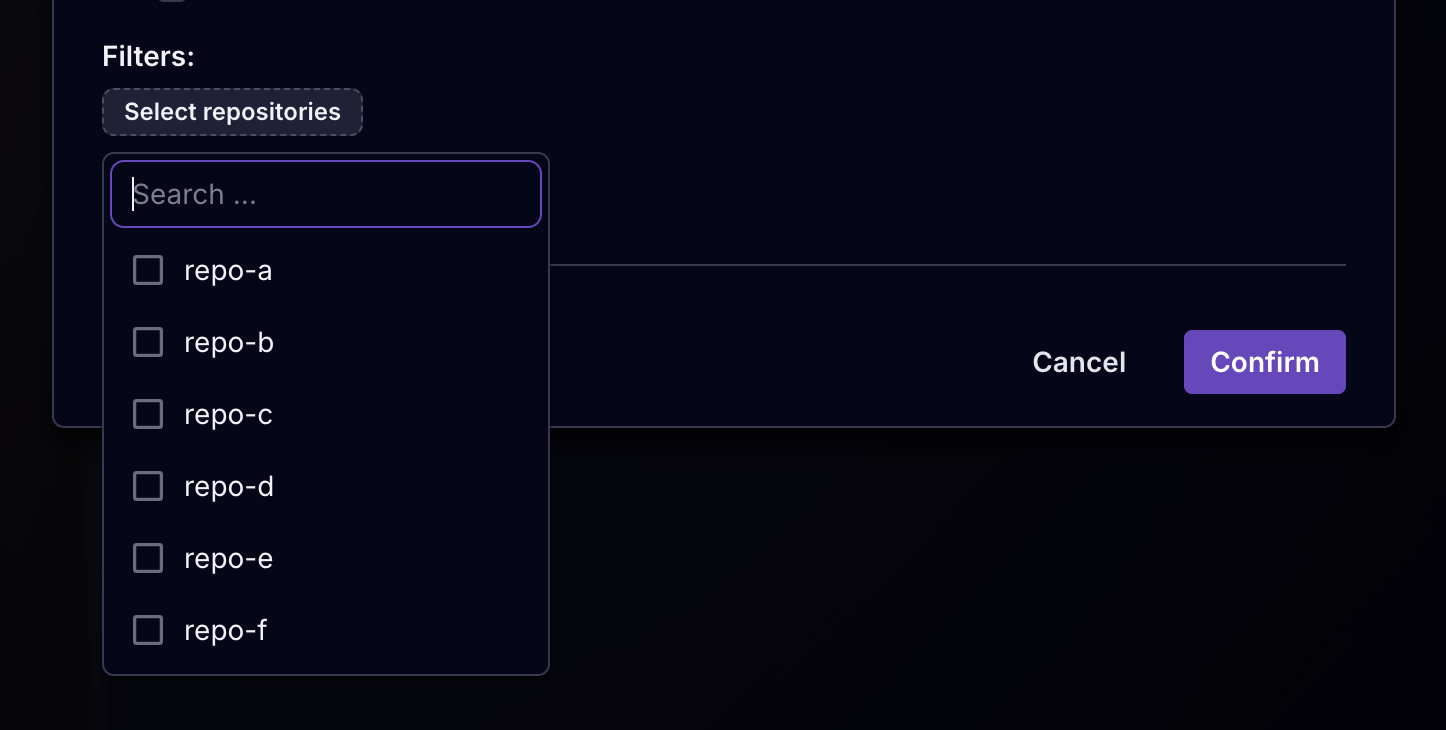
You can select a single or multiple repositories. By setting up multiple webhooks, you can notify different receivers depending on repository.
Advanced configuration
Under advanced setting you can add a custom header to the POST request.
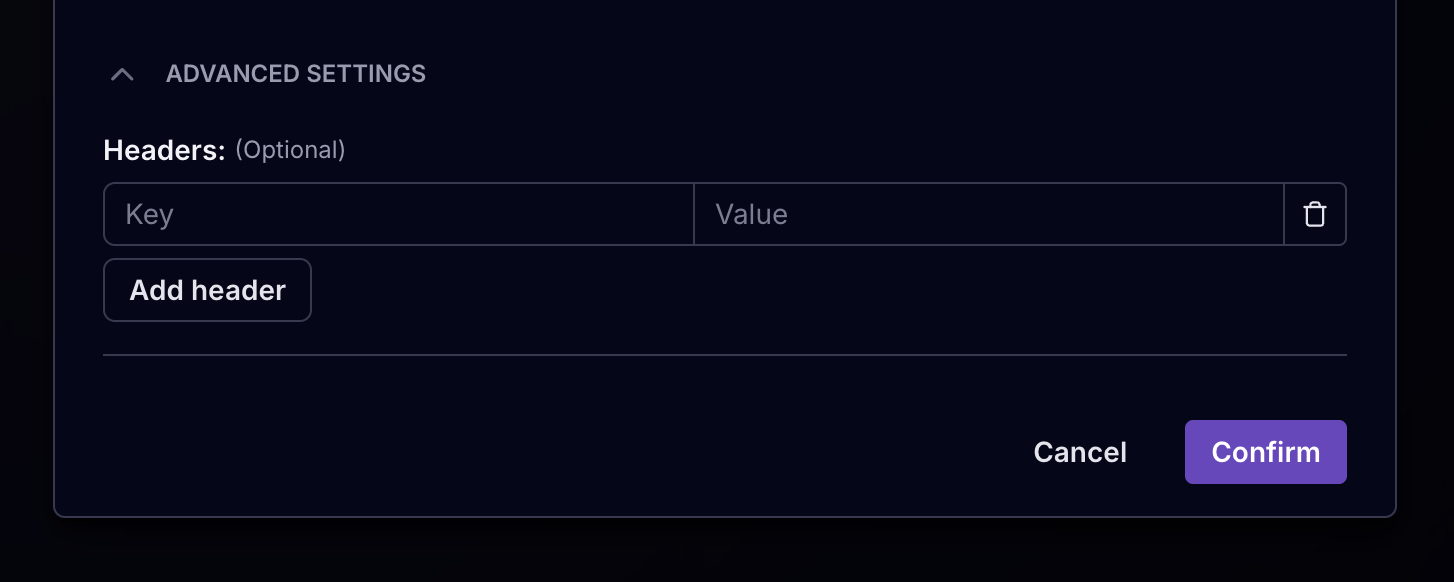
This allows you to add multiple custom headers to the request.
Payload structure
The webhook data structure is following guidelines from the Standard Webhooks specification.
{
  "type": "pull-request:scan",
  "timestamp": "2025-10-21T12:26:00.000000Z",
  "data": {
    ...
  }
}
The data payload structure will vary depending on the event type, but we will streamline as much as possible.
Here's an example for the pull-request:scan event:
{
  "type": "pull-request:scan",
  "timestamp": "2025-10-21T12:26:00.000000Z",
  "data": {
    "organization": {
      ...
    },
    "repository": {
      ...
    },
    "pullRequest": {
      ...
    },
    "scan": {
      ...
    }
  }
}
Webhook event payloads for alert:created, alert:updated, and alert:cleared share the same schema.
Here's an example of the alert:updated event:
{
  "type": "alert:updated",
  "eventId": "SOCKET-DUMMY-2751@5",
  "schemaType": "alert@1",
  "data": {
    "alert": {
      ...
    },
    "organization": {
      ...
    }
  },
  "timestamp": "2025-11-19T20:53:53.148713Z"
}
Webhook signing key
The webhook signing key we generate is a base64 encoded random string of 24 bytes (192 bits) according to Standard Webhooks specification, with the whsec_ prefix.
Here's an example:
// Webhook signing key example:
whsec_h4fk4iWceEsgYw/JbT9Feg98sgSFYsAy
(Don't use this example in your configuration)
Verify the webhook payload
Each webhook will have a x-webhook-signature header that can be used to verify that the payload has not been compromised.
The signature is generated with an HMAC using the SHA256 algorithm and, before being encoded, is comprised of the timestamp and the stringified JSON payload of the request. The header value will look like this:
t=timestamp,s=encoded-signature
To verify the payload, you can recreate the signature using the signing key and compare it to the one sent in the header.
- Split the
x-webhook-signaturevalue on the comma (",") and extract the values of timestamp and signature. - Construct the value of the signature by concatenating:
- The timestamp (as a string)
- The character
. - The stringified JSON payload
- Generate the signature with an HMAC and SHA256 algorithm using the signing key from your webhook's configuration.
- Compare your generated signature with the one extracted in step one; they should match exactly.
- If the timestamp is more than five minutes old you may decide you want to reject the payload for additional security.
A webhook signature can be constructed in different ways, some companies adds an id before encoding. The encoding we use is similar to a signature from Stripe.
Try this tool for testing: https://www.standardwebhooks.com/verify/stripe
Here's an example:
// This example uses Express to receive webhooks
const express = require("express");
const crypto = require("crypto");

const app = express();

// Find your webhook's signing key in the Socket dashboard
const webhookSecret = "whsec_[...]";

// Match the raw body to content type application/json
app.post(
  "/webhook",
  express.raw({ type: "application/json" }),
  (request, response) => {
    // Extract the timestamp and signature from the header
    const [timestamp, originalSignature] = request.headers[
      "x-webhook-signature"
    ]
      .split(",")
      .map((part) => part.substring(2));

    // Construct the value from timestamp and raw body buffer
    const value = `${timestamp}.${request.body.toString()}`;

    // Generate the signature with a HMAC using the SHA256 algorithm
    const reconstructedSignature = crypto
      .createHmac("sha256", webhookSecret)
      .update(value)
      .digest("base64");

    console.log("Original Signature:   ", originalSignature);
    console.log("Constructed Signature:", reconstructedSignature);

    // Compare the signature from the header with your reconstructed signature to validate
    const isValid = crypto.timingSafeEqual(
      Buffer.from(originalSignature, "utf-8"),
      Buffer.from(reconstructedSignature, "utf-8"),
    );

    // Send a response back
    if (!isValid) {
      return res.status(400).json({ message: "Invalid webhook signature" });
    }
    res.status(200).json({ message: "Webhook received successfully" });
  },
);

app.listen(3086, () => console.log("Running on port 3086"));
How To
Reference internal id's in the webhook
If you need to reference internal id's in the webhook, e.g. if you have multiple organizations, there's a few options:
-
(Recommended) Set up multiple webhooks and use the same signing key. Append id's as part of the URL for each webhook, e.g.
https://mysite.com/webhooks/endpoint/:id, and extract the id from the path. This is a common pattern with express routes. -
Set up multiple webhooks and use the same URL and signing key for each. Add individual custom headers to each webhook and extract after signature verification. Example:

-
Create a map with the data id from the webhooks payload and the internal id.
Test webhooks
You don't need a special tool or application to receive a webhook, but some specialized applications do a great job of getting you started.
- https://webhook.site/ – webhook endpoint on-demand. Receive and inspect webhooks.
- https://www.standardwebhooks.com/verify – debug a webhook signature.
Updated about 1 month ago